
Meanwhile big thanks for your amazing service. The 4G router Martin installed yesterday is running beautifully. I am an extremely happy client, you always look after me superbly well. Thanks to Stuart too.


If you find yourself having intermittent problems with websites loading slowly, email not working and seeing out of date websites, you could be having problems with your DNS servers.
All Internet Providers provide DNS as part of the connection and these convert a website name such as bbc.co.uk into the actual address of the website which is something like 63.194.125.69.
Unfortunately the DNS Servers that you get with your Internet connection are usually pretty bad, they can be slow and out of date and sometimes even block Remote Desktop connections. Another great reason for using a different DNS provider is that a lot of them provide protection against malware, viruses, phishing and scam sites by completely blocking your access to them.
The good news is that it's very easy to switch over to using a different DNS service which can help resolve these problems and make your day to day browsing better.
In this example, we're going to use DNS servers provided by quad9.net and Cloudflare. These are both very secure services that help keep your web browsing fast and secure. Other DNS services are available, but some use your web browsing to sell information to advertisers so we specifically recommend Quad9 and Cloudflare services as we know they're secure and don't store any information about your browsing habits.
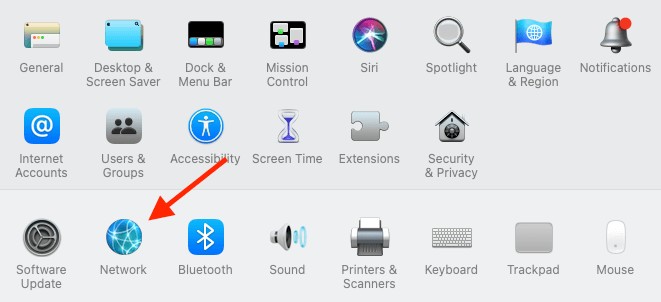
The first step is to open System Preferences, you can find this in the Apple menu at the top left of your screen. Once you've opened System Preferences, click on the Network icon.
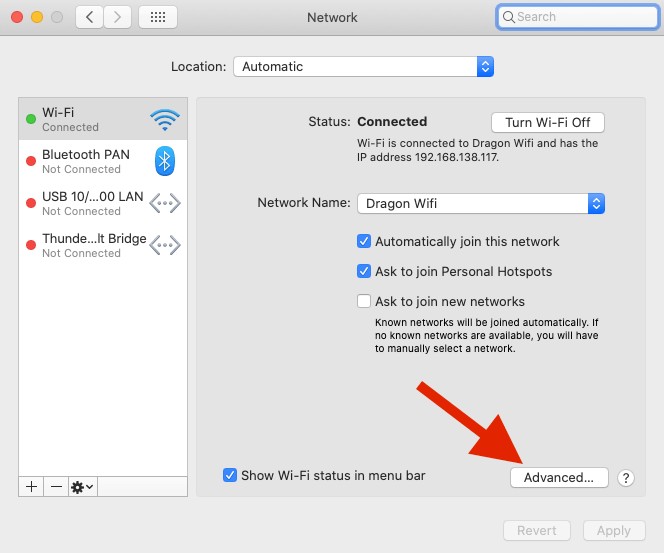
In Network preferences, make sure your connection method (WiFi or Ethernet) is selected down the left hand side and then click on Advanced.
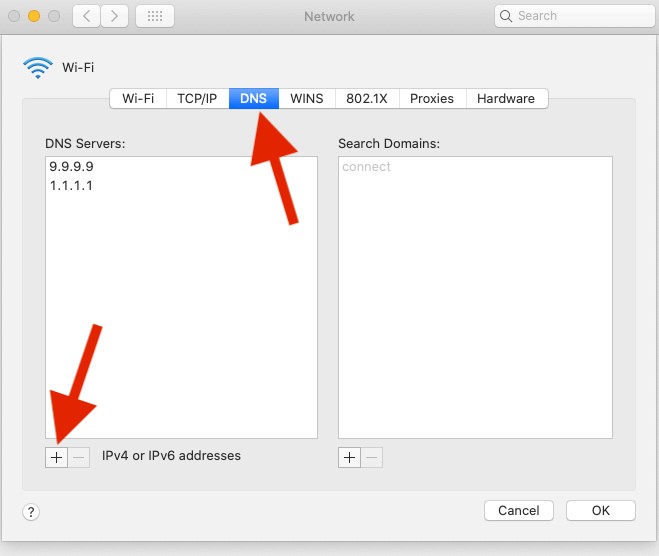
A new window will pop up, click on the DNS tab across the top and you'll see your default DNS information in grey under DNS Servers. You just need to click on the + icon at the bottom left, type in 9.9.9.9 and then click on + again. Now type in 1.1.1.1 and press enter. Now click on OK at the bottom right of the window, then click Apply on the window behind that and that's it!
You're now using faster, more secure DNS and should see an improvement in your browsing speed and things like email should work better for you too.
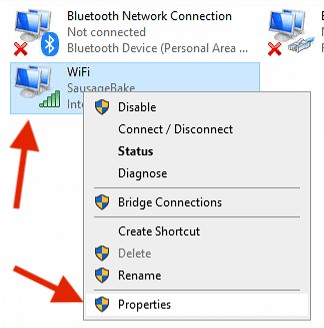
You'll now see the different network devices on your PC (WiFi or Ethernet) so right click on the connection you're using (in this case WiFi) and then click on Properties.
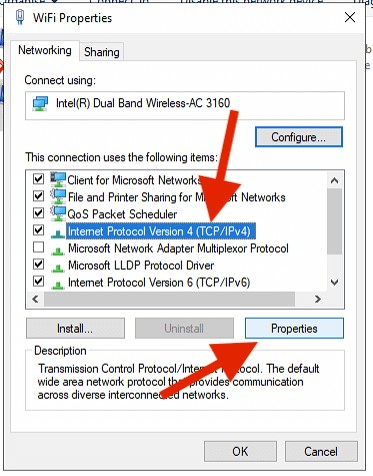
A new WiFi Properties window will now pop up, find Internet Protocol Version 4 (TCP/IPv4) in the list, click on it once and then click on Properties.
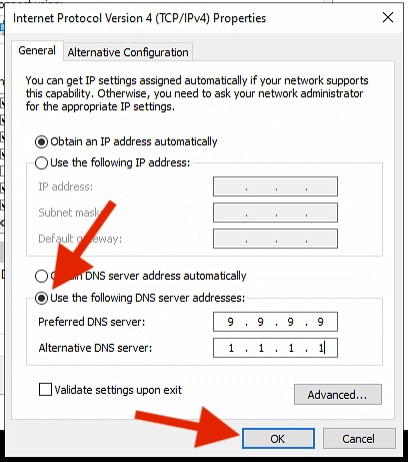
Another window will pop up, down the bottom you'll see the option to Use the following DNS server addresses, tick that box and enter 9.9.9.9 in the preferred DNS server and 1.1.1.1 in the Alternative DNS server boxes and then click on OK.
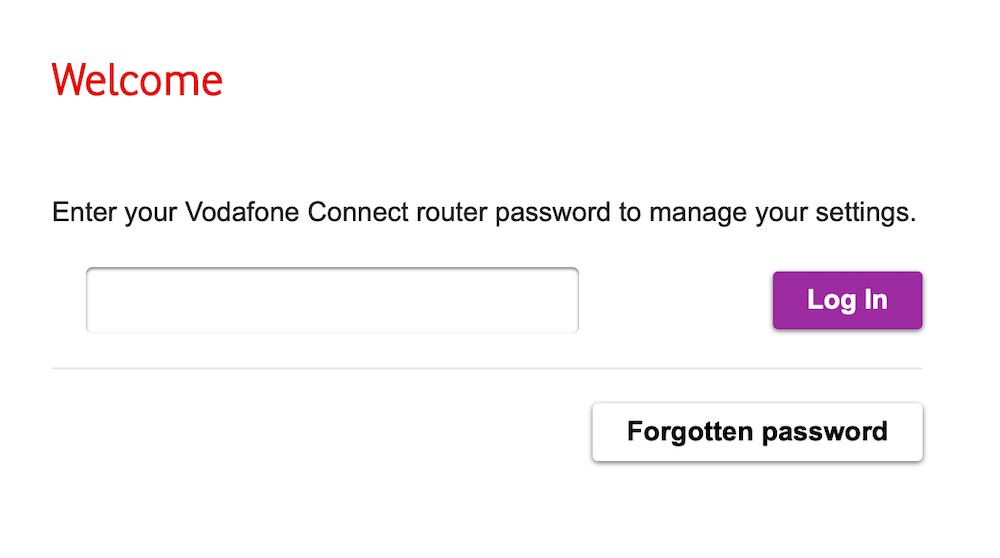
If you look on the back of your router, you should see the IP address of the router (usually something like 192.168.1.1) and the admin login details. Type the IP address of the router into your web browser, being sure to put them into the address bar at the top of the browser and not into a search box.
You should then see your router login page, so enter the admin login from the back of the router and click Log In.
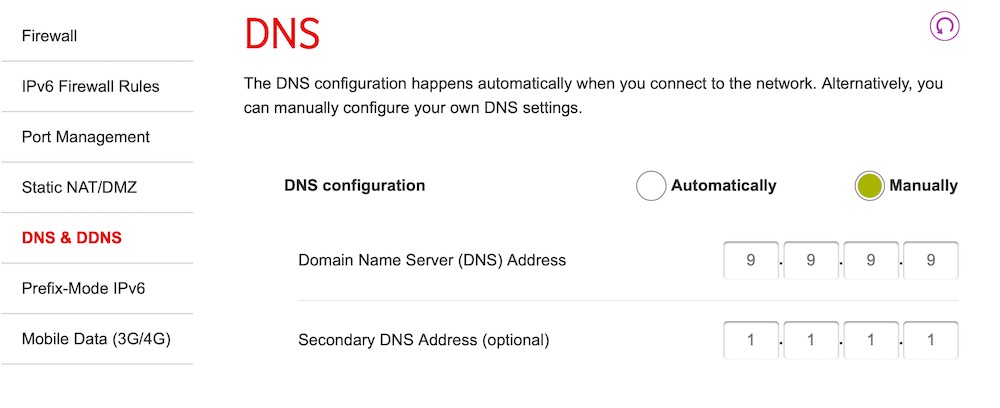
 Once you're logged in, you should be able to find the DNS settings in the router settings. Do remember that not all routers will allow you to update the DNS settings so if you don't see them, it's best to set up the DNS on your devices instead. Enter 9.9.9.9 into the primary DNS and 1.1.1.1 into the secondary DNS and then save the settings.
 Your router may then restart and once you've back online, you should be using those safer DNS Servers on all your devices.
For mobile devices, you can enter the new DNS settings manually into the network settings on both iOS and Android, but the easiest way is to install the Cloudflare app which you can find a link to here https://1.1.1.1/ and this will protect and speed up your browsing on all types of connection, WiFi and mobile.
All Internet Providers provide DNS as part of the connection and these convert a website name such as bbc.co.uk into the actual address of the website which is something like 63.194.125.69.
Unfortunately the DNS Servers that you get with your Internet connection are usually pretty bad, they can be slow and out of date and sometimes even block Remote Desktop connections. Another great reason for using a different DNS provider is that a lot of them provide protection against malware, viruses, phishing and scam sites by completely blocking your access to them.
The good news is that it's very easy to switch over to using a different DNS service which can help resolve these problems and make your day to day browsing better.
In this example, we're going to use DNS servers provided by quad9.net and Cloudflare. These are both very secure services that help keep your web browsing fast and secure. Other DNS services are available, but some use your web browsing to sell information to advertisers so we specifically recommend Quad9 and Cloudflare services as we know they're secure and don't store any information about your browsing habits.
macOS
It's very easy to change your DNS Servers on macOS and it can make a big different to your web browsing.The first step is to open System Preferences, you can find this in the Apple menu at the top left of your screen. Once you've opened System Preferences, click on the Network icon.
In Network preferences, make sure your connection method (WiFi or Ethernet) is selected down the left hand side and then click on Advanced.
A new window will pop up, click on the DNS tab across the top and you'll see your default DNS information in grey under DNS Servers. You just need to click on the + icon at the bottom left, type in 9.9.9.9 and then click on + again. Now type in 1.1.1.1 and press enter. Now click on OK at the bottom right of the window, then click Apply on the window behind that and that's it!
You're now using faster, more secure DNS and should see an improvement in your browsing speed and things like email should work better for you too.
Windows 10
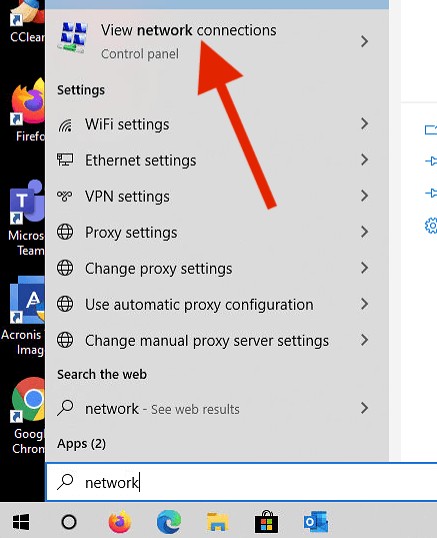
On Windows 10, there are a few more steps but it's still very easy. The first step is to click on the Start button, type in "network" and click on View network connections.You'll now see the different network devices on your PC (WiFi or Ethernet) so right click on the connection you're using (in this case WiFi) and then click on Properties.
A new WiFi Properties window will now pop up, find Internet Protocol Version 4 (TCP/IPv4) in the list, click on it once and then click on Properties.
Another window will pop up, down the bottom you'll see the option to Use the following DNS server addresses, tick that box and enter 9.9.9.9 in the preferred DNS server and 1.1.1.1 in the Alternative DNS server boxes and then click on OK.
Router
Changing the DNS Servers on your router has the advantage of making sure that all devices connected to your WiFi or Ethernet connection are using the better DNS, but it can be more complicated to set up and not all routers will let you do this.If you look on the back of your router, you should see the IP address of the router (usually something like 192.168.1.1) and the admin login details. Type the IP address of the router into your web browser, being sure to put them into the address bar at the top of the browser and not into a search box.
You should then see your router login page, so enter the admin login from the back of the router and click Log In.
Once you're logged in, you should be able to find the DNS settings in the router settings. Do remember that not all routers will allow you to update the DNS settings so if you don't see them, it's best to set up the DNS on your devices instead. Enter 9.9.9.9 into the primary DNS and 1.1.1.1 into the secondary DNS and then save the settings.Your router may then restart and once you've back online, you should be using those safer DNS Servers on all your devices.For mobile devices, you can enter the new DNS settings manually into the network settings on both iOS and Android, but the easiest way is to install the Cloudflare app which you can find a link to here https://1.1.1.1/ and this will protect and speed up your browsing on all types of connection, WiFi and mobile.
FEATURED PRODUCTS


Featured Product
Why not follow us?


Tekeez support both PC/Windows users and Mac users equally, so whether you have a Mac or a PC we can help.
Tekeez are proud to have been providing legendary IT Superhero services and support for 30 years, since 1994.
Why not try our services and discover the secret of our success?


© 1994-2026 EuroSolve Ltd - Tekeez® is a registered trademark and brand of EuroSolve Ltd
0333 023 0001.
0333 023 0001.
Tekeez® Oxford:
Prama House • 267 Banbury Road • Oxford • OX2 7HT
Tekeez® Caerphilly:
Britannia House • Caerphilly Business Park • Van Road • Caerphilly • CF83 3GG