

Very prompt service and extremely efficient.
The staff are very friendly, easy to converse with when one is computer-illiterate, no feeling of being patronised for lack of computer/IT knowledge/skills. I would recommend this company fully for their professionalism, knowledge and experience.

In a previous Tekeez Tip, we showed you how to see where your disk space was being used in both Windows and macOS. As this process has now changed in both Windows 11 and macOS Ventura, we thought it was time for a new time to help you see what's using up all your disk space in macOS 10.13 Ventura.
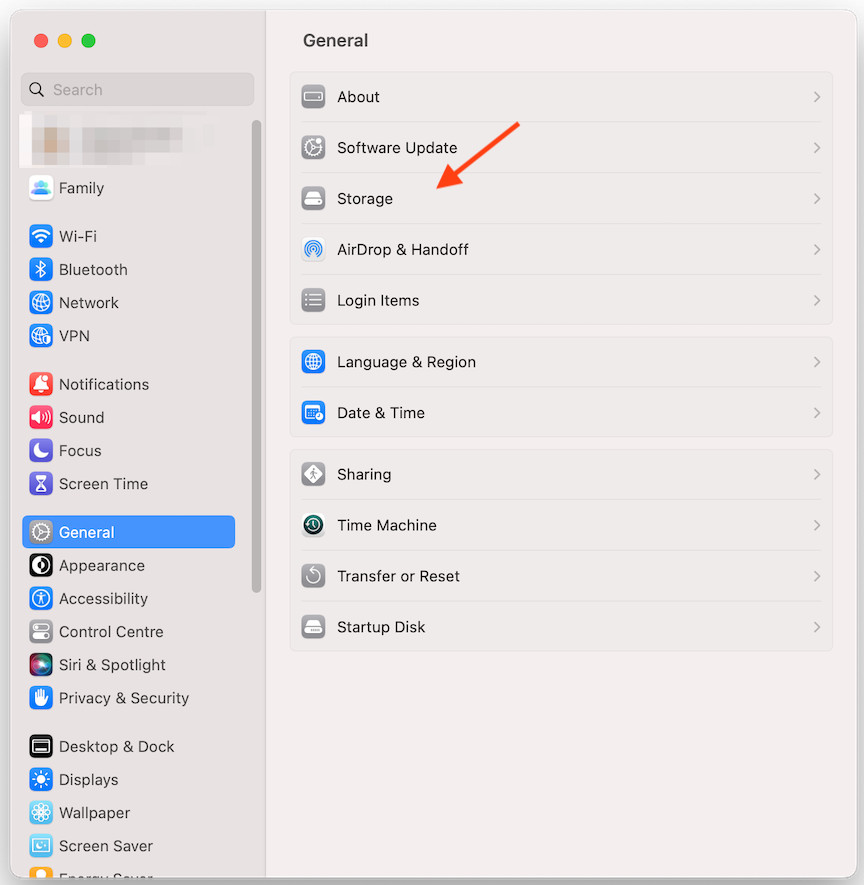
The first step is to click on the Apple menu at the top left of the screen and then click on System Settings. This will open the new Settings app which has replaced the old System Preferences.
Now click on General on the left hand side and you'll see how much space is being used and all the categories broken down so you can easily see where your space is being used.
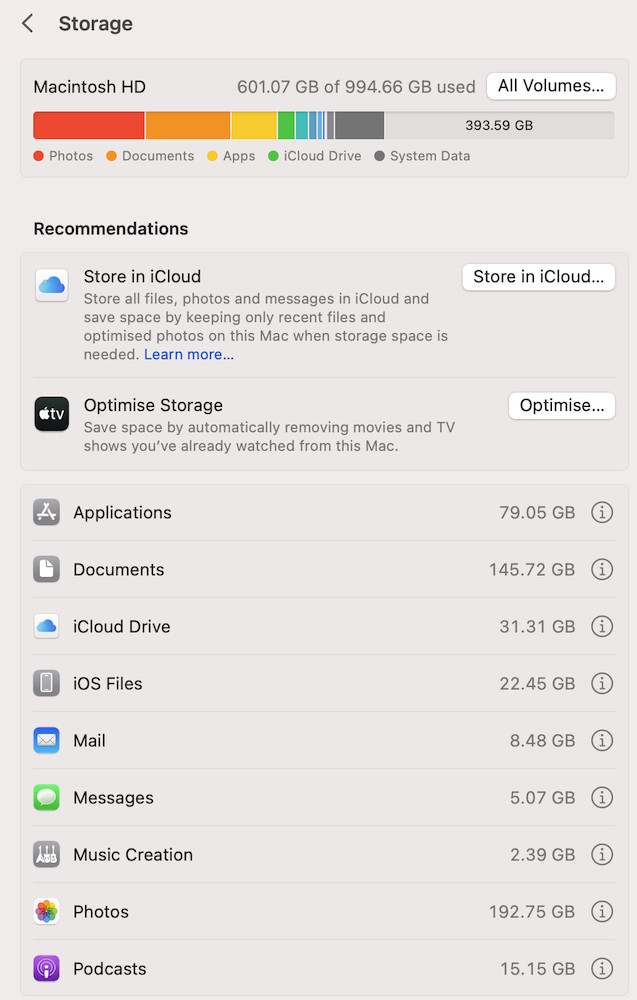
If you click on the i next to each category, you can go further into what's using the space, for example if you click on the i next to Documents, you'll see a new window open listing all the files in your Documents folder by size, so you can see exactly what's using up your space.
This will hopefully help you keep an eye on how much space is being used and how you can reclaim some of the space. As always, if you need help with this, please do let us know.
If you have any ideas for tips you'd like to see here, please do let us know.
The first step is to click on the Apple menu at the top left of the screen and then click on System Settings. This will open the new Settings app which has replaced the old System Preferences.
Now click on General on the left hand side and you'll see how much space is being used and all the categories broken down so you can easily see where your space is being used.
If you click on the i next to each category, you can go further into what's using the space, for example if you click on the i next to Documents, you'll see a new window open listing all the files in your Documents folder by size, so you can see exactly what's using up your space.
This will hopefully help you keep an eye on how much space is being used and how you can reclaim some of the space. As always, if you need help with this, please do let us know.
If you have any ideas for tips you'd like to see here, please do let us know.
FEATURED PRODUCTS


Featured Product

Why not follow us?


Tekeez support both PC/Windows users and Mac users equally, so whether you have a Mac or a PC we can help.
Tekeez are proud to have been providing legendary IT Superhero services and support for 30 years, since 1994.
Why not try our services and discover the secret of our success?


© 1994-2026 EuroSolve Ltd - Tekeez® is a registered trademark and brand of EuroSolve Ltd
0333 023 0001.
0333 023 0001.
Tekeez® Caerphilly:
Britannia House • Caerphilly Business Park • Van Road • Caerphilly • CF83 3GG
Tekeez® Oxford:
Prama House • 267 Banbury Road • Oxford • OX2 7HT